There are a couple of ways to implement infrastructure as code and create Azure resource in an automated way. From Azure point of view, the most commonly known way is using ARM templates. Everybody who has worked with ARM templates knows that they're are complex to work with and impossible to debug, especially for larger deployments.
Microsoft tried to improve the experience, by providing validation tools, but working with complex JSON structures remains like working with YAML, it's really hard.
Some other companies started on their own (cloud agnostic) approach to infrastructure as code. In previous blog posts I demonstrated how to create API Management resources with Terraform and Pulumi.
Hello Bicep
Finally, Microsoft came to the conclusion that creating ARM templates should be simplified and they started project Bicep. The idea behind Bicep is to describe the resources with a DSL and compile that into an ARM template. So the output of the process still is a JSON structure. This is different from the other approaches, where there is no output but the definition or code is executed directly against a management API to make the necessary changes.
By having a tool to generate the ARM template, a validation step is part of the process and it's less error prone oposed to hand crafting an ARM template.
Getting started with Bicep
To be able to compile bicep files into ARM templates, you need the Bicep CLI. To install the prerequisites, follow this documentation. Make sure you also install the VS Code extension, which is really helpful if you want code completion (and I can tell you, you want this). It not only helps with resource types, but also with enums in properties.
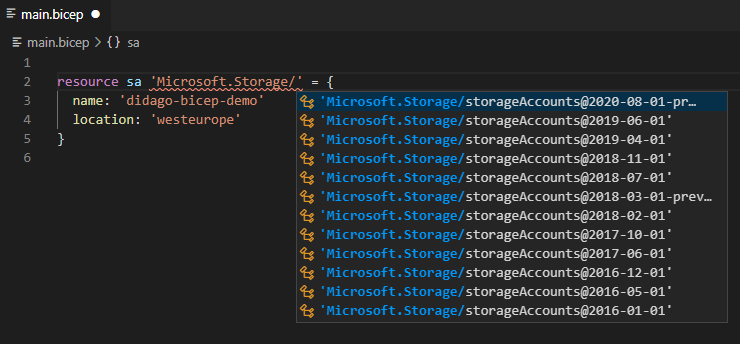
As example, creating a Storage account. Here the VS Code extension helps you selecting the correct API version. This at first might seem confusing, but allows you to target a specific version containing the feature you need.
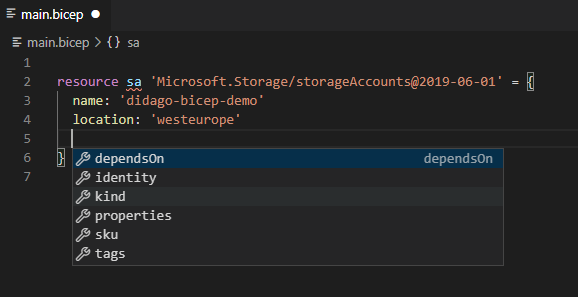
Code completion helps with configuring the correct properties on the resource.
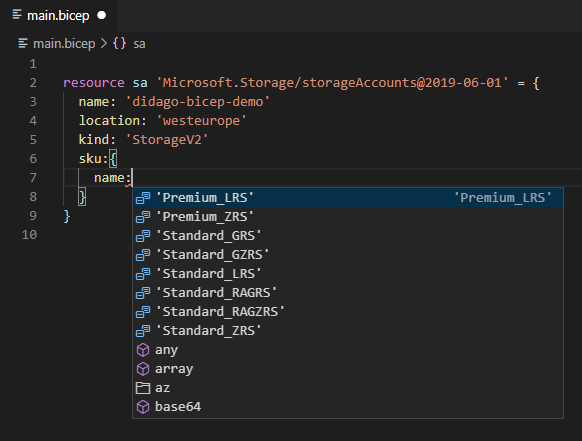
And with the options you have for a certain property.
To create a new storage account, the piece below is sufficient. It consists of the keyword ‘resource’, followed by a name to reference the resouce later on. Next the resource to create and a set of properties.
resource sa 'Microsoft.Storage/storageAccounts@2019-06-01' = {
  name: 'didago-bicep-demo'
  location: 'westeurope'
  kind: 'StorageV2'
  sku:{
    name: 'Standard_LRS'
    tier:'Standard'
  }
}
If you save this to a file named main.bicep and compile this with this CLI command bicep build main.bicep the following ARM template output is generated:
{
  "$schema": "https://schema.management.azure.com/schemas/2019-04-01/deploymentTemplate.json#",
  "contentVersion": "1.0.0.0",
  "functions": [],
  "resources": [
    {
      "type": "Microsoft.Storage/storageAccounts",
      "apiVersion": "2019-06-01",
      "name": "didago-bicep-demo",
      "location": "westeurope",
      "kind": "StorageV2",
      "sku": {
        "name": "Standard_LRS",
        "tier": "Standard"
      }
    }
  ]
}
This is the ARM template in JSON format, for which we can use existing ARM template tooling to create the actual resources based on it.
Bicep params and variables
In a deployment script you'll have environment based parameters injected during deployment, and variables to contain temporary values. Bicep is using parameter and variable terminology that is very close to what's used in ARM templates, so if you're familiar with ARM it should be easy to read. We can use string interpolation to construct variable values based on other variables.
// Params can be injected during deployment, typically for deploy-time values
param env string = 'dev'
param sa_sku object = {
  sku: 'Standard_LRS'
  tier: 'Standard'
 }

// Vars can contain runtime variable values
var region = 'we'
var company = 'didago'
var saName = replace('${company}-sa-${env}-${region}', '-', '')
var apimName = '${company}-apim-${env}-${region}'
Create API Management
As I did earlier with Terraform and Pulumi, I'm going to create a API management resource using Bicep. However, as project Bicep still is experimental, the APIM example will not contain all these resources.
The APIM configuration for Bicep will consist of the following resources:
- Storage Account
- API Management
- Application Insights
All necessary files can be found in my github repo. If you want to know the rationale behind why I picked this set of resources, please read the Terraform blog.
Storeage account
We start with a Storage account, with two containers:
// Create storage account to hold API and APIM related files
resource sa 'Microsoft.Storage/storageAccounts@2019-06-01' = {
  name: '${saName}'
  location: '${resourceGroup().location}'
  kind: 'StorageV2'
  sku: sa_sku
  properties:{
    supportsHttpsTrafficOnly: true
  }
}

// Link container to storage account by providing path as name
resource saContainerApim 'Microsoft.Storage/storageAccounts/blobServices/containers@2019-06-01' = {
  name: '${sa.name}/default/apim-files'
}
resource saContainerApi 'Microsoft.Storage/storageAccounts/blobServices/containers@2019-06-01' = {
  name: '${sa.name}/default/api-files'
}
To save a value as output, we can use this
// Output the storage account name, because we need it later in the deployment to deploy files to it
output storageAccountName string = sa.name
API management
Next step is the core resource, APIM itself.
We create a resource in the developer tier with a capacity of 1. Most of the settings are correct by default, like enabled TLS version, so we don't need to specify a lot.
resource apim 'Microsoft.ApiManagement/service@2019-12-01' = {
  name: '${apimName}'
  location: '${resourceGroup().location}'
  sku:{
    capacity: 1
    name: 'Developer'
  }
  identity:{
    type:'SystemAssigned'
  }
  properties:{
    publisherName: 'Didago'
    publisherEmail: 'email@address.com'
  }
}
The following resource definition adds a default tenant level policy:
resource apimPolicy 'Microsoft.ApiManagement/service/policies@2019-12-01' = {
  name: '${apim.name}/policy'
  properties:{
    format: 'rawxml'
    value: '<policies><inbound /><backend><forward-request /></backend><outbound /><on-error /></policies>'
  }
}
Different from Terraform, but like ARM templates work, the resources are in a hierarchy. This means that if you want to address the policy of an APIM instance, you address it like <apim>/policy or <apimProduct>/policy for a product level policy.
Application insights
To prepare APIM for diagnostics, we need an Application Insights instance.
// Create Application Insights
resource ai 'Microsoft.Insights/components@2015-05-01' = {
  name: '${aiName}'
  location: '${resourceGroup().location}'
  kind: 'web'
  properties:{
    Application_Type:'web'
  }
}

// Create Logger and link logger
resource apimLogger 'Microsoft.ApiManagement/service/loggers@2019-12-01' = {
  name: '${apim.name}/${apim.name}-logger'
  properties:{
    resourceId: '${ai.id}'
    loggerType: 'applicationInsights'
    credentials:{
      instrumentationKey: '${ai.properties.InstrumentationKey}'
    }
  }
}
Configuring APIM
Now we have all resources in place, it's time to do some configuration.
What we're going to do is:
- Configure a product, user and subscription
Product, user and subscription
Creating a product, user and subscription is similar to creating other resources.
// Create a product
resource apimProduct 'Microsoft.ApiManagement/service/products@2019-12-01' = {
  name: '${apim.name}/custom-product'
  properties: {
    approvalRequired: true
    subscriptionRequired: true
    displayName: 'Custom product'
    state: 'published'
  }
}

// Add custom policy to product
resource apimProductPolicy 'Microsoft.ApiManagement/service/products/policies@2019-12-01' = {
  name: '${apimProduct.name}/policy'
  properties: {
    format: 'rawxml'
    value: '<policies><inbound><base /></inbound><backend><base /></backend><outbound><set-header name="Server" exists-action="delete" /><set-header name="X-Powered-By" exists-action="delete" /><set-header name="X-AspNet-Version" exists-action="delete" /><base /></outbound><on-error><base /></on-error></policies>'
  }
}

// Add User
resource apimUser 'Microsoft.ApiManagement/service/users@2019-12-01' = {
  name: '${apim.name}/custom-user'
  properties: {
    firstName: 'Custom'
    lastName: 'User'
    state: 'active'
    email: 'custom-user-email@address.com'
  }
}

// Add Subscription
resource apimSubscription 'Microsoft.ApiManagement/service/subscriptions@2019-12-01' = {
  name: '${apim.name}/custom-subscription'
  properties: {
    displayName: 'Custom Subscription'
    primaryKey: 'custom-primary-key-${uniqueString(resourceGroup().id)}'
    secondaryKey: 'custom-secondary-key-${uniqueString(resourceGroup().id)}'
    state: 'active'
    scope: '/products/${apimProduct.id}'
  }
}
Comparing this with for example Terraform, this process is easier and more intuitive. With Terraform you create a product resource, a subscription resource and a link-subscription-to-product resource. In the Bicep DSL you directly link the subscription to the product, in this case by means of a scope.
Deployment
As described earlier you can build the bicep file to convert it into an ARM template by usingbicep build main.bicep. This will generate amain.jsonfile.
Next, you can deploy the ARM template using for example the Azure CLI:az deployment group create -f main.json -g didago-bicep-demo.
How would this work with Azure DevOps? The bicep file can be part of the provisioning files in source control. As part of the build pipeline the bicep file can be converted to ARM and added to the artifacts. In the release pipeline the ARM template can be used to create the Azure resources.
Considerations
It's a good thing Microsoft finally acknowledged that, despite the tooling, ARM templates are hard to create. Having a ‘Terraform-like’ approach by defining resources, makes it way easier to work with ARM templates.
Would I choose Bicep over Terraform?
At this moment there is no reason to start using Bicep, as it's not production ready yet. It's in the experimental phase so things will change before it will be released. Interesting to know is, once Bicep is released, you can generate Bicep files from existing ARM templates. This mean if you're currently using ARM templates, you can directly start using Bicep and take advantage of this easy way of work.
One of the major differences between Terraform, Pulumi and Bicep is that Bicep is a layer directly on top of ARM. The other solutions use a translation layer to convert the Terraform/Pulumi code into commands to execute against the cloud. That means that when a new version of an ARM API becomes available, you directly can take advantage of it when you use Bicep. When working with Terraform for example, you have to wait until the dev team implements and publishes this new version. Factually you always are behind Microsoft regarding availability of new features or bugfixes, when not using Bicep.
One other thing to keep in mind is that Bicep only helps in generating ARM templates, but doesn't change anything about how ARM templates work. In Terraform the current state is stored in a tfstate file. This state file is used to compare against the desired state, to generate the necessary commands to change the current state to reach the desired state. This involves creating and updating, but also deleting resources.
As nothing changes in the way ARM templates work, the tooling remains the same. Check out the what-if and mode flag in az deployment group to get similar behavior.
As we speak, Bicep is at version 0.2.59 (alpha) and the first release was only last August. Things are going fast, but it's quite far from release. The entire project is open source, so I expect a lot of progress the upcoming months so it's certainly a project to keep an eye on.
If you have any comments or remarks, you can reach me on Twitter @jeanpaulsmit.