In a previous blog post I demonstrated how to create a multi-region setup for Azure API Management (APIM) using a Standard tier. There I mentioned Terraform as an alternative for ARM templates and in this blog post I'd like to explain how to create a full set of APIM resources using Terraform instead of ARM templates.
Infrastructure as Code
I suppose everybody working with Azure and automated resource creation is familiar with ARM or Azure Resource Manager templates. It's a way of implementing infrastructure as code by specifying which resources need to be created and how they need to be configured. ARM templates contain resource definitions in JSON format and can be executed by the Azure Resource Manager to create and configure the resources.
This approach has been the standard for quite some time, but there are some things about ARM templates that I don't like.
- ARM templates have a steep learning curve
- JSON templates are hard to ‘develop’, cannot be debugged and quickly become hard to maintain
- Resources can only be created or updated, not deleted unless it's an entire deletion of the resource
- ARM is Azure only
I'm not the only one having doubts about ARM templates. Respected members of the community like Pascal Naber and Mark Heath both point to Azure CLI as an alternative. For my project I decided to go for Terraform mainly because one of the most prominent members of the integration community blogged about it.
What is Terraform?
Both ARM templates and Terraform describe resources by means of a definition file. Both ARM template and Terraform have an engine to interpret the definition and convert them into calls to the Azure management API to perform actions on resources.
So what is the difference?
First of all, definitions in Terraform are much easier to read and understand. I'm not going into the details as this is not a Terraform course, but take a look at the difference to create a Storage Account between ARM template and Terraform definition.
Secondly Terraform can perform full create, update and deletes of resources or parts of resources. ARM templates have so called deployment modes which defines what needs to be done. In incremental mode only resources are added or updated, never deleted. In complete mode resources are deleted as well. This should be sufficient but doesn't really work when you need to remove for example a product or user from APIM. ARM templates cannot do that.
Terraform has a different approach to resources: it keeps track of the state resources are in by storing a ‘tfstate’ file in a Storage Account, which contains the state after it's finished. The next time an adjusted definition is executed, the Terraform engine compares the expected output of the definition with the tfstate in the Storage Account. Changes are executed by calling the Azure management API. This allows for deleting (sub)resources and also is very efficient as unchanged resources remain untouched.
To end with, Terraform is provider agnostic. Of course, for Azure specific stuff there are specific libraries, but the way of working, the structure of the definitions and tooling are the same regardless if you deploy to Azure, AWS, Alibaba cloud or any of the other providers.
One backdraw of Terraform is it can only implement functionality when the Azure management API supports it. In the event something is not available in there (yet), but is as ARM template, it's possible for Terraform definitions to contain entire ARM templates to fill that gap.
Terraform Baseline
I'm not going to cover Terraform basics, if you are new to Terraform it's not a good idea to start with creating APIM that way anyway. Please follow this track to get a basic understanding of what Terraform is like.
The version of AzureRM used in my project is 2.1.0 which is the latest at the moment.
provider "azurerm" {
  version = "=2.1.0"
  features {}
}
To have consistent resource naming, we use a couple variables to construct names. Some resources in the definitions need to have an Azure-wide unique name, so the resource names are based on:
- prefix (typically a company abbreviation)
- resource function (what is this resource about or for)
- environment (dev, test, acc, prd)
- region (region where deployed in)
This leads for example to the following local variable:
locals {
  resourceGroupName  = "${var.prefix}-${var.resourceFunction}-${var.environment}-${var.region}"
}
The resource group name would become for example: didago-apim-dev-we
Configuration
The idea is to use Terraform to setup an entire APIM configuration consisting of the following resources:
- Storage Account
- Key vault
- API Management + custom domain + configuration
- Application Insights
We need a Storage Account to store the Open API and (APIM) policy files in. To be able to import an API into APIM via Terraform (or ARM), the Open API information must be publicly accessible. Open Api documents can sometimes be exposed on an endpoint by the API itself, but for policy files we need a place to host them.
We need Key vault to store the certificate necessary to setup custom domains.
API management is the core resource itself and we'll also add a default API to APIM to serve as heartbeat API for a load balancer.
Application insights will be the tool to store diagnostics information in.
All necessary files can be found in my github repo.
Terraform Resource Group and Storage Account Resources
First of all we need a resource group to store all resources in. Next we need a Storage Account with two containers to store the APIM and API related files in.
We'll start with the resource group and Storage Account and containers.
# define local variables
locals {
  resourceGroupName  = "${var.prefix}-${var.resourceFunction}-${var.environment}-${var.region}"
  storageAccountName = "${var.prefix}${var.resourceFunction}sa${var.environment}${var.region}"
}
First we create the resource group where everything will end up in:
# create resource group
resource "azurerm_resource_group" "rg" {
  name     = local.resourceGroupName
  location = var.location
  tags     = var.tags
}
And the storage account with two containers:
# Create Storage Account
resource "azurerm_storage_account" "sa" {
  name                      = local.storageAccountName
  resource_group_name       = azurerm_resource_group.rg.name
  location                  = azurerm_resource_group.rg.location
  account_tier              = var.storageAccountSku.tier
  account_replication_type  = var.storageAccountSku.type
  account_kind              = "StorageV2"
  enable_https_traffic_only = true
  tags                      = var.tags
}
resource "azurerm_storage_container" "saContainerApim" {
  name                  = "apim-files"
  storage_account_name  = azurerm_storage_account.sa.name
  container_access_type = "private"
}
resource "azurerm_storage_container" "saContainerApi" {
  name                  = "api-files"
  storage_account_name  = azurerm_storage_account.sa.name
  container_access_type = "private"
}
In my example project I'm not using separate files for policies or Open API documents, so I kind of create the Storage Accounts for nothing here. Everything in this project is defined in the definition itself as you'll see, as this simplifies the solution but it's a best practice to have them separated for maintainability reasons. If you want to have the policy files in a separate container, you need to split creating the Storage Account from the rest of the definition. This gives you the option to copy the necessary file into the containers before creating the rest of the resources which needs them. To dynamically determine to which Storage Account to copy the files, you can specify an output in the definition file.
output "storageAccountName" {
  value = azurerm_storage_account.sa.name
}
Like mentioned earlier, under the hood Terraform also needs a Storage Account to store the ‘tfstate’ file in. However that will be created by the Terraform engine itself (based on configuration setup in the definition) when you perform the init step.
** Remark: To simplify execution I've disabled the configuration of the backend, so the tfstate file is created on my local disk and not in a Storage Account. When running this in a DevOps release pipeline, then this definitely must be enabled and configured to use a Storage Account to keep track of the tfstate file.
Terraform APIM Resources
With the storage account in place we can start with rest of the resources.
First we add a couple of variables to have consistent naming across the other resources.
  apimName          = "${var.prefix}-${var.resourceFunction}-${var.environment}-${var.region}"
  kvName            = "${var.prefix}-${var.resourceFunction}-kv-${var.environment}-${var.region}"
  appInsightsName   = "${var.prefix}-${var.resourceFunction}-appinsights-${var.environment}-${var.region}"
Key vault
Key Vault will host the certificate which we need for our custom domain and in a later stage Key Vault can also contain API key secrets in case a backend API needs one. The Terraform engine executing the definition, needs permissions to import the certificate into Key Vault so we need to set them explicitly.
In Terraform you can get access to the account context variables by using:
data "azurerm_client_config" "current" {}
** Remark: the data declaration means we just want a reference to a resource, not create one if it doesn't exist.
With azurerm_client_config you can get access to:
- Tenant Id
- Subscription Id
- Client Id
- Object Id
We create the Key Vault instance which needs the Tenant Id for authenticating requests to Key Vault:
# create key vault
resource "azurerm_key_vault" "kv" {
  name                        = "local.kvName
  location                    = "azurerm_resource_group.rg.location
  resource_group_name         = "azurerm_resource_group.rg.name
  enabled_for_disk_encryption = false
  tenant_id                   = data.azurerm_client_config.current.tenant_id
  tags                        = var.tags
  sku_name                    = "standard"
}
Next step is to set explicit permissions to the current identity to read and write to Key Vault so we can import the certificate.
# set key vault permissions
resource "azurerm_key_vault_access_policy" "kvPermissions" {
  key_vault_id = azurerm_key_vault.kv.id

  tenant_id = data.azurerm_client_config.current.tenant_id
  object_id = data.azurerm_client_config.current.object_id

  secret_permissions = [
    "get"
  ]

  # Give full control to the sevice principal as it might need to delete a certificate on the next update run
  certificate_permissions = [
    "create",
    "delete",
    "get",
    "import",
    "list",
    "update"
  ]
}
Next we need to import the certificate into Key Vault. The password for the certificate is passed in as variable in my example, but such an important value needs to stay a secret and should be provided either via Key Vault or a secured DevOps pipeline variable (to overwrite the default one).
# Upload certificate to Key vault
resource "azurerm_key_vault_certificate" "kvCertificate" {
  name         = "apim-didago-nl-tls-certificate"
  key_vault_id = azurerm_key_vault.kv.id

  certificate {
    contents = filebase64("certificates/${var.apimProxyHostConfig.certificateFilename}")
    password = var.apimProxyHostConfigCertificatePassword
  }

  certificate_policy {
    issuer_parameters {
      name = var.apimProxyHostConfig.certificateIssuer
    }

    key_properties {
      exportable = true
      key_size   = 2048
      key_type   = "RSA"
      reuse_key  = false
    }

    secret_properties {
      content_type = "application/x-pkcs12"
    }
  }
}
API management
Next step is the core resource what this blog is all about, APIM itself.
We create a resource in the developer tier with a certain capacity. Most of the settings are correct by default, like enabled TLS version, so we don't need to specify a lot.
If you use Tenant level policies and you store them as a separate file in a Storage Account, then you need to specify a publicly accessible URL. I've disabled it here because I don't use one for my demo project.
resource "azurerm_api_management" "apim" {
  name                = local.apimName
  location            = azurerm_resource_group.rg.location
  resource_group_name = azurerm_resource_group.rg.name
  publisher_name      = var.apimPublisherName
  publisher_email     = var.apimPublisherEmail
  tags                = var.tags

  sku_name            = "${var.apimSku}_${var.apimSkuCapacity}"

  identity {
    type = "SystemAssigned"
  }

  # policy {
  #   xml_link = var.tenantPolicyUrl
  # }
}
Creating APIM takes about 45 minutes, so we have to wait to take the next step.
We enabled managed identities on the APIM resource. A managed identity is an Azure Active Directory account to which we can assign permissions to access other resources. We use this to assign permissions to the APIM AD account to read the certificate from Key Vault.
# Assign get certificate permissions to APIM so APIM can access it
resource "azurerm_key_vault_access_policy" "kvApimPolicy" {
  key_vault_id = azurerm_key_vault.kv.id

  tenant_id = data.azurerm_client_config.current.tenant_id
  object_id = azurerm_api_management.apim.identity.0.principal_id

  secret_permissions = [
    "get"
  ]

  certificate_permissions = [
    "get",
    "list"
  ]
}
Application insights
To prepare APIM for diagnostics, we need an Application Insights instance. Unfortunately it's not possible yet to directly link the Application Insights instance to APIM, but it's important to have an instance ready in case you need to enable diagnostics in APIM. We need an Application Insights instance and a resource called Logger to link APIM and Application Insights.
# Create Application Insights
resource "azurerm_application_insights" "ai" {
  name                = local.appInsightsName
  resource_group_name = azurerm_resource_group.rg.name
  location            = azurerm_resource_group.rg.location
  application_type    = "web"
  tags                = var.tags
}
# Create Logger
resource "azurerm_api_management_logger" "apimLogger" {
  name                = "${local.apimName}-logger"
  api_management_name = azurerm_api_management.apim.name
  resource_group_name = data.azurerm_resource_group.rg.name

  application_insights {
    instrumentation_key = azurerm_application_insights.ai.instrumentation_key
  }
}
Configuring APIM
Now we have all resources in place, it's time to do some configuration.
What we're going to do is:
- Setup custom domains
- Configure a product, user and subscription
- Set custom subscription key
Custom domains
We use Powershell to setup custom domains and custom subscription keys, as that functionality is not supported by Terraform.
We can use the so called null_resource for this. We call a Powershell script in which we pass in some variables to do the work for us.
# Run script to apply host configuration, which is only possible when APIM managed identity has access to Key Vault certificate store
resource "null_resource" "apimManagementHostConfiguration" {
  provisioner "local-exec" {
    command = "./scripts/SetApimHostConfiguration.ps1 -resourceGroupName ${azurerm_resource_group.rg.name} -apimServiceName ${azurerm_api_management.apim.name} -apiProxyHostname ${var.apimProxyHostConfig.hostName} -kvCertificateSecret ${azurerm_key_vault_certificate.kvCertificate.secret_id}"
    interpreter = ["PowerShell", "-Command"]
  }
  depends_on = [azurerm_api_management.apim, azurerm_key_vault_access_policy.kvApimPolicy]
}
The depends_on element instructs Terraform that execution should wait for dependencies to finish. Without this instruction Terraform would execute as much as possible in parallel, which would obviously cause issues.
The script itself contains a couple of Powershell commands to change the APIM configuration to setup custom domains. You can find the details on my github repo so I'm not going into these details here.
Product, user and subscription
As a demonstration what Terraform is capable of, I'd like to create a product (with policy), user and subscription. The interesting thing here is that Terraform can remove products from APIM if you change the definition, unlike ARM templates.
A product in APIM is just another resource definition. If you need to create a number of products, then you can use a for-each construct to generate a products based on a list, with just one resource declaration. Assigning a policy to a product is also straight forward. Keep in mind that although I'm using an inline policy, you can also use a publicly accessible link to a policy here.
# create product
resource "azurerm_api_management_product" "product" {
  product_id            = var.product.productId
  api_management_name   = azurerm_api_management.apim.name
  resource_group_name   = azurerm_resource_group.rg.name
  display_name          = var.product.productName
  subscription_required = var.product.subscriptionRequired
  subscriptions_limit   = var.product.subscriptionsLimit
  approval_required     = var.product.approvalRequired
  published             = var.product.published
}
# assign policy to product
resource "azurerm_api_management_product_policy" "productPolicy" {
  product_id          = var.product.productId
  api_management_name = azurerm_api_management.apim.name
  resource_group_name = azurerm_resource_group.rg.name
  xml_content = <<XML
    <policies>
      <inbound>
        <base />
      </inbound>
      <backend>
        <base />
      </backend>
      <outbound>
        <set-header name="Server" exists-action="delete" />
        <set-header name="X-Powered-By" exists-action="delete" />
        <set-header name="X-AspNet-Version" exists-action="delete" />
        <base />
      </outbound>
      <on-error>
        <base />
      </on-error>
    </policies>
  XML
  depends_on = [azurerm_api_management_product.product]
}
A user can be created in a similar way:
# create Users
resource "azurerm_api_management_user" "user" {
  user_id             = "${var.product.productId}-user"
  api_management_name = azurerm_api_management.apim.name
  resource_group_name = azurerm_resource_group.rg.name
  first_name          = "User"
  last_name           = var.product.productName
  email               = "${var.product.productId}-${var.environment}@didago.nl"
  state               = "active"
}
And a subscription to link a user to a product:
# create subscription
resource "azurerm_api_management_subscription" "subscription" {
  api_management_name = azurerm_api_management.apim.name
  resource_group_name = azurerm_resource_group.rg.name
  product_id          = azurerm_api_management_product.product.id
  user_id             = azurerm_api_management_user.user.id
  display_name        = "Some subscription"
  state               = "active"
}
Custom subscription key
Currently it's not possible in Terraform to specify the subscription key when creating the resource. In my previous blog the problem was discussed. This becomes a real problem for multi region deployments, where the subscription keys need to be aligned across regions to provide the same experience to consumers regardless of the region they access. In Premium tier all this is arranged for you, but if you use the much cheaper Standard tier then you need to do it yourself.
We also use Powershell for this:
# --- Set fixed Subscription key to allow multi-region on Standard tier ---
# This is not supported out of the box, so use a powershell command (Set-AzApiManagementSubscription)
resource "null_resource" "apimSubscriptionKey" {
  triggers = {lastRunTimestamp = timestamp()}
  provisioner "local-exec" {
    command = "./scripts/SetApimSubscriptionKey.ps1 -resourceGroupName ${azurerm_resource_group.rg.name} -apimServiceName ${azurerm_api_management.apim.name} -productId ${var.product.productId} -userId ${azurerm_api_management_user.user.user_id} -subscriptionKey ${var.product.subscriptionKey} -adminUserEmail ${var.apimPublisherEmail} -adminSubscriptionKey ${var.product.adminSubscriptionKey}"
    interpreter = ["PowerShell", "-Command"]
  }
  depends_on = [azurerm_api_management_subscription.subscription]
}
We set both the user subscription key as well as the one with tracing permissions. triggers forces a re-execution of the Powershell. This is mainly useful when you changed the subscription key value and want that to be updated. Without it the tfstate file won't see a difference and ignore the change.
Import heart beat API
When the configuration is multi region then a load balancer comes into play. This load balancer likes to know if all instances in it's pool are healthy. To facilitate this we setup APIM with a heart beat API. This is nothing more than a mock API telling the load balancer the APIM instance is fine.
For creating an API we need to provide the Open API specification. This can be provided as publicly accessible URL or directly as body in the resource definition. In this case I decided to use the latter, for demonstration purposes, but also because this is an Open API which is not going to change a lot.
# create API
resource "azurerm_api_management_api" "apiHealthProbe" {
name                = "health-probe"
resource_group_name = azurerm_resource_group.rg.name
api_management_name = azurerm_api_management.apim.name
revision            = "1"
display_name        = "Health probe"
path                = "health-probe"
protocols           = ["https"]

  subscription_key_parameter_names  {
    header = "AppKey"
    query = "AppKey"
  }

  import {
    content_format = "swagger-json"
    content_value  = <<JSON
      {
          "swagger": "2.0",
          "info": {
              "version": "1.0.0",
              "title": "Health probe"
          },
          "host": "not-used-direct-response",
          "basePath": "/",
          "schemes": [
              "https"
          ],
          "consumes": [
              "application/json"
          ],
          "produces": [
              "application/json"
          ],
          "paths": {
              "/": {
                  "get": {
                      "operationId": "get-ping",
                      "responses": {}
                  }
              }
          }
      }
    JSON
  }
}
This created the API definition itself, but it doesn't do anything yet. We also need to set a policy on the API to return HTTP 200.
# set api level policy
resource "azurerm_api_management_api_policy" "apiHealthProbePolicy" {
  api_name            = azurerm_api_management_api.apiHealthProbe.name
  api_management_name = azurerm_api_management.apim.name
  resource_group_name = azurerm_resource_group.rg.name

  xml_content = <<XML
    <policies>
      <inbound>
        <return-response>
            <set-status code="200" />
        </return-response>
        <base />
      </inbound>
    </policies>
  XML
}
To make the setup complete, we also need to assign the API to a product so the load balancer knows which subscription key to use to access the heart beat API.
# assign api to product
resource "azurerm_api_management_product_api" "apiProduct" {
  api_name            = azurerm_api_management_api.apiHealthProbe.name
  product_id          = azurerm_api_management_product.product.product_id
  api_management_name = azurerm_api_management.apim.name
  resource_group_name = azurerm_resource_group.rg.name
}
Testing
With all resource definitions in place, it's time to put it to the test.
We need terraform init for initialization and terraform apply -var-file=didago-apim.dev.tfvars to execute using the development environment variables.
As everything is in one definition file, we can just kick it off and wait for it to finish. Make sure you run az login before execution, to make sure the resources end up where you expect them.
After about 45 minutes we have:
- Storage account to be prepared for APIM and API files
- Key Vault to host certificates and secrets
- Fully setup APIM instance with
- Custom domain configured
- A product, a user and a subscription to link the two
- A custom subscription key
- Heart beat API
- Application Insights instance to be prepared for diagnostics
Azure DevOps
My favorite tool to ‘develop’ Terraform definitions is Visual Studio Code as it has excellent support for Terraform. You can install the Terraform extension by Mikael Olenfalk, it provides syntax highlighting and code completion. You can use the Terminal window in VS Code to execute and test the definitions which is very convenient.
The definition layout and Terraform.exe version you use, must be compatible. About every two weeks a new version of Terraform.exe is released and sometimes changes in the way to define or write things are introduced. That is the main reason I have Terraform.exe in my repo, so I know the two work together. This however leads to an additional 50 Mb in my repo, not optimal but having to download the Terraform version every time I need to work on it also isn't.
After testing locally, it's time to set it up in a CI/CD environment. In Azure DevOps the build step is very simple: just copy the provisioning files as build artifacts.
The release is a bit more comprehensive, as we need to get our hands on Terraform.exe, initialize it and run apply with a certain set of variables. One option is to set this up entirely yourself, for example with Powershell. When you have Terraform.exe in your repo, you can use that one and run the init and apply. If you don't want to have this binary in your repo, you need to download and unpack it. Also you need to setup the Storage Account for the tfstate file yourself.
As an alternative you can use the Release Tasks by Charles Zipp. It provides a task to download and install a configurable version of Terraform.exe so it doesn't need to be in your build artifacts. It also contains a task to run init, plan, validate or apply.
If you use that build task, then the first step would be to install the version of Terraform you need.
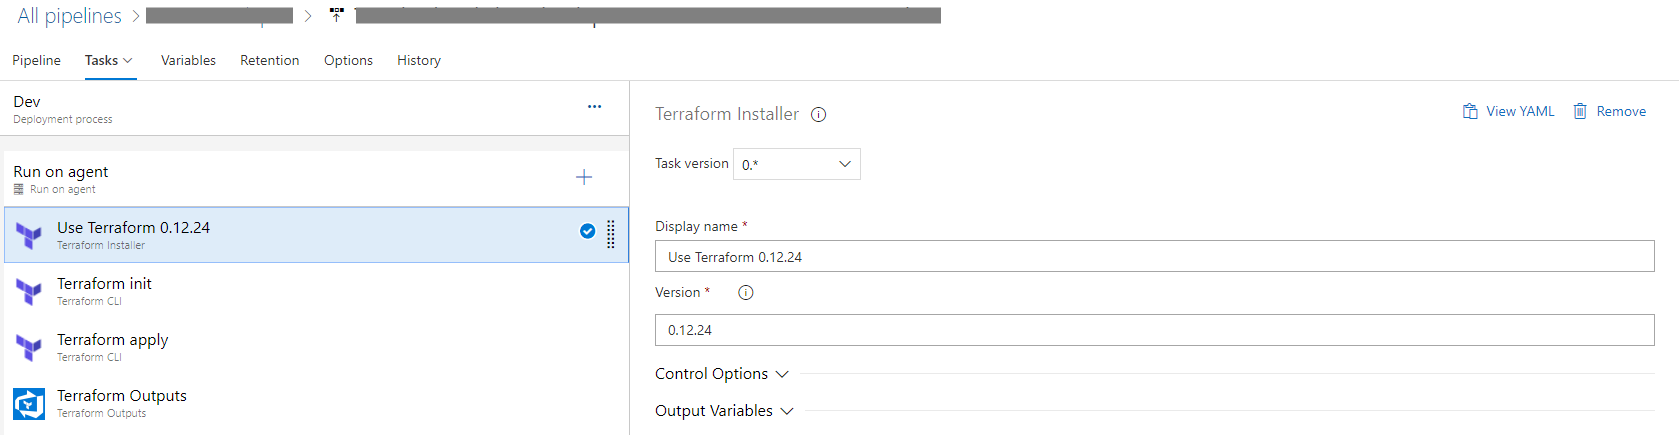
Next step is to initialize Terraform.
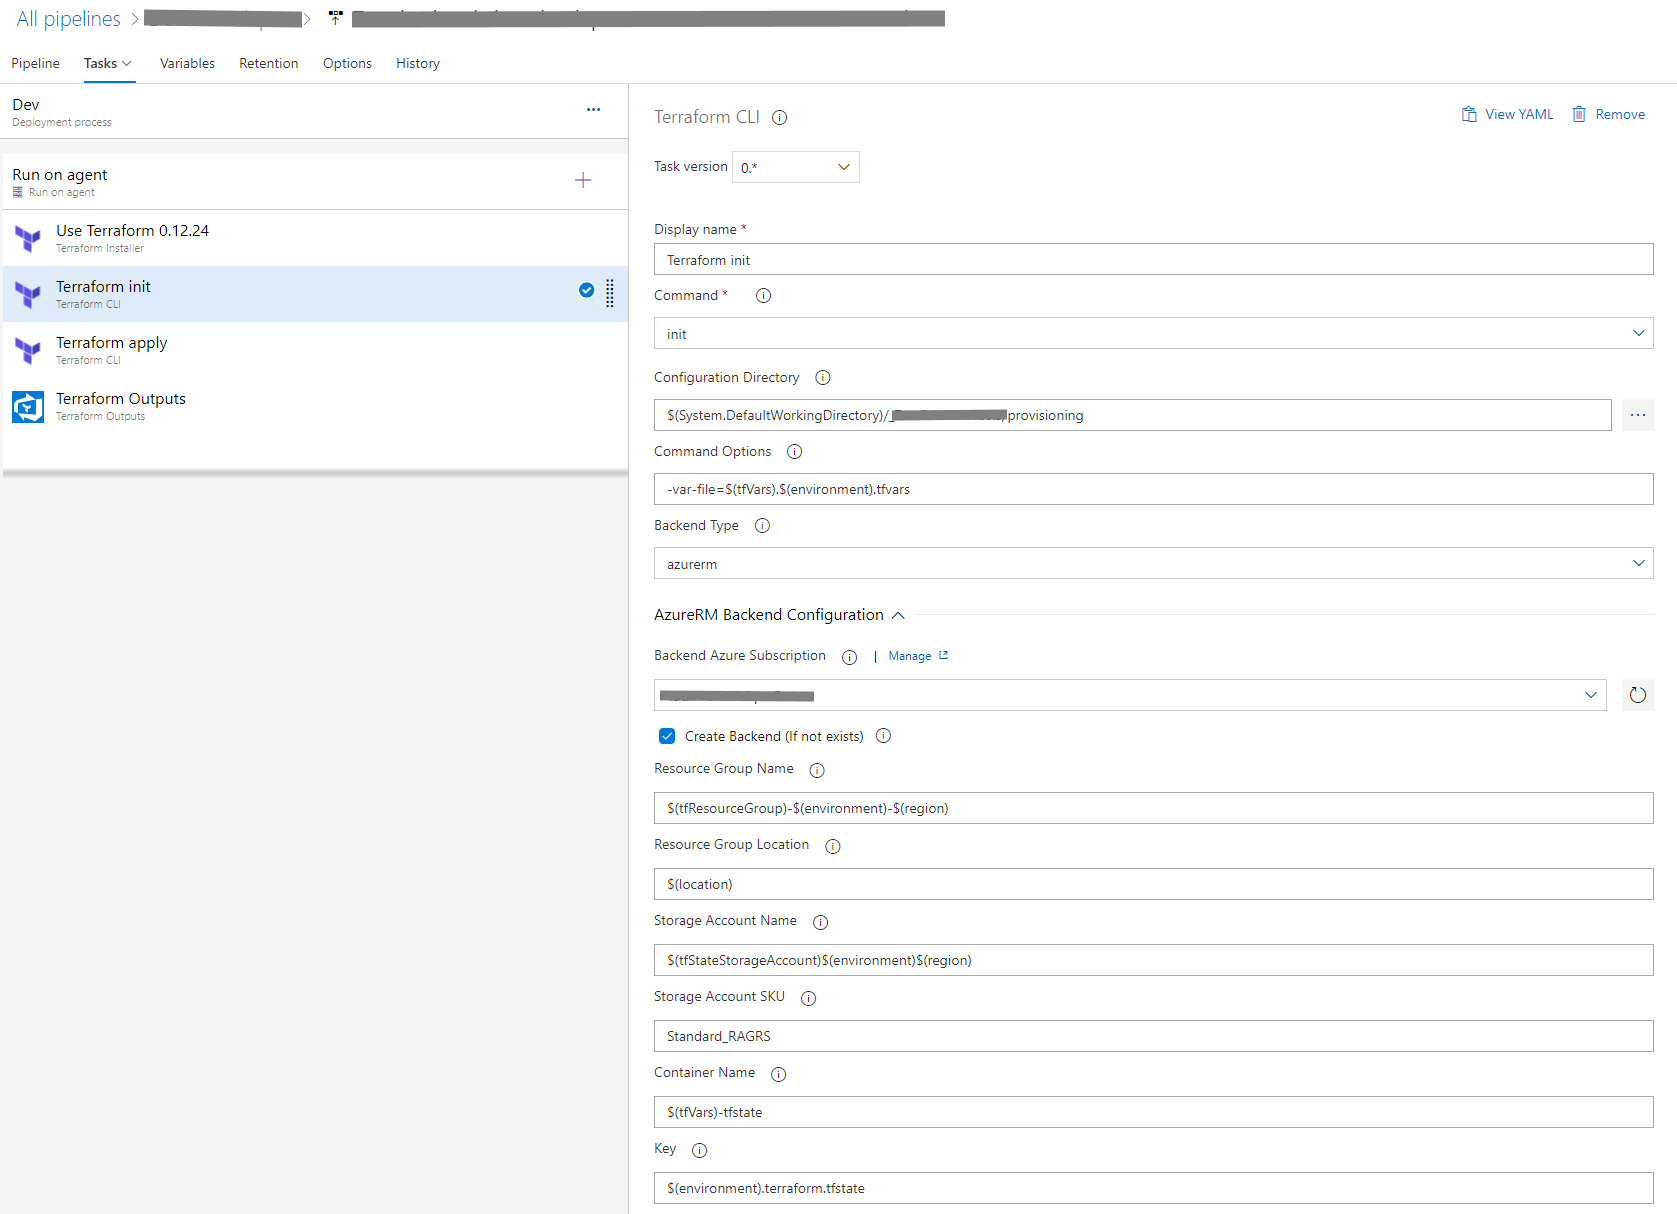
There are a couple of things to mention here.
Terraform.exe always uses the .tf file it finds in the (configuration directory) folder specified, therefore you cannot have more than one .tf file in this folder. With the “-var-file” command option you can specify the environment file to use. Finally you can specify the AzureRM backend Storage Account to use (or create) to store the tfstate file in. I've defined a couple of pipeline variables to make it easier to switch between environments.
Finally run apply to execute, here I specify a couple of overrides for region and location so I can reuse this easily to a different region by just changing the pipeline variables.

If you need to get the output of a Terraform definition, then you can use the Terraform Output task by Raul Arrieta.
Considerations
Setting this up can be that simple. You do need to keep in mind that running Terraform apply locally and in a DevOps release pipeline are two different things. This means the outcome can be different, to start with because you execute things using a different identity.
Another example is the fact that I ran into issue with AzureRM version 2.1.0 and the release tasks. Switching to the lower version 1.44 solved that one, but locally the 2.1.0 version worked fine. This can be overcome by using Powershell in the release pipeline, but then you need to develop and maintain that part yourself. Having the tasks doing things for you is very convenient.
This has become quite a long blog post, but I think it will help you getting this up and running. If you have any comments or remarks, you can reach me on Twitter @jeanpaulsmit.