Azure API Management (APIM) comes with different pricing flavors and different features per flavor. Most companies like to have the Premium pricing tier as that one supports more scaling options, VNET integration and multi-region support. However with a price tag of about USD 34000 per year it's also an expensive solution. It even becomes more expensive when customers learn that for each of the deployed regions of their multi-region solution, they pay an addional USD 34k. That quickly adds up.
What if we could simulate the multi-region support with just a Standard tier?
A Standard tier still costs USD 8400, but is way cheaper than Premium. When using standard tier in a multi-region setup, the most important question is how to align the deployments across various regions?
Multi-region support makes it easy to distribute the configuration across regions by updating just the primary region, the engine behind the Premium tier takes care of distributing all this to the other regions. Let's see how we can achieve that with Standard tier.
Of course the Premium tier does have other important features like VNET support, which currently is only available for that tier. This can be very important from security perspective and is impossible to achieve with Standard tier.
Do it yourself multi-region support
What do we need for multi-region support?
- single endpoint for API consumers, so it's transparant to which region the request is forwarded to
- centralized configuration, so a change in one (primary) region is propagated to other regions
A single endpoint for customers, for example api.contoso.com, means we need custom domains and a load balancer which decides to which region to route the request to. The load balancer can be one of choice, for example Azure Frontdoor or Cloudflare, and is out of scope here.
Regardless of the pricing tier, when you use Azure resources there has to be a reproducable way of creating and configuring them. In that way you can be quickly (relatively as creating an APIM instance takes up to 45 minutes) up and running when you need to recover from a disaster. This is a job for CI/CD. There are a lot of different tools for this, but I like to use Azure DevOps with Terraform. (I'll write a different blog post on the topic of Terraform and APIM.)
In the release pipeline in Azure DevOps, one of the tasks will be to create the APIM instance. When that's done, the task to setup the custom domains will be executed. I use Powershell to configure the custom domain in an automated way. As part of the entire CI/CD process a certificate is stored in Azure Key Vault (and the password as encrypted pipeline variable in the release pipeline). Setting up the key vault and uploading the certificate is a separate step in the release pipeline and out of scope here.
The PowerShell below configures a custom domain on an APIM instance.
$resourceGroupName = "jps-blog"
$apimServiceName = "jps-blog"
$apiProxyHostname = "api.contoso.com"
$kvCertificateSecret = "https://keyvault-url-to-pfx"

# Allow cmdlets to be used
Install-Module -Name Az -AllowClobber -Scope CurrentUser -force

# Login to the correct Azure Subscription
$Credential = Get-Credential
Connect-AzAccount -Credential $Credential

# Create the HostnameConfiguration object for Proxy endpoint
$proxyConfiguration = New-AzApiManagementCustomHostnameConfiguration -Hostname $apiProxyHostname -HostnameType Proxy -KeyVaultId $kvCertificateSecret

# Get reference to APIM instance and apply the configuration to API Management
$apimContext = Get-AzApiManagement -ResourceGroupName $resourceGroupName -Name $apimServiceName
$apimContext.ProxyCustomHostnameConfiguration = $proxyConfiguration
Set-AzApiManagement -InputObject $apimContext
In the Powershell script the following steps are executed:
- Login to the correct Azure Subscription
- Install the necessary Az modules
- Create a new Custom host name configuration section
- Get a reference to the APIM instance to update
- Update the Custom host name section
- Update the APIM instance
After having setup the custom domain, the next step is to make sure the APIM configuration is deployed.
Configuration can consist of:
- Security settings
- Products, users and subscriptions
- Groups
- Policies
- Named values
All this can be created and configured by using Terraform. Contrary to ARM templates, Terraform keeps track of the state of resources and their configuration. This means that when a product is added, updated or removed from APIM, Terraform makes sure it happens. Especially deleting is something ARM templates don't support and is very valuable.
Multi region deployment
How do we get all this deployed to the regions we want to have it?
In the Premium tier this is taken care of, but in Standard tier we need to do it ourselves.
Options are to have everything in a single release pipeline or have a release pipeline per region. Both have their advantages. Everything in one release pipeline means all steps for all regions are executed in one set of sequential steps, so you basically only have to kick off a single pipeline to get everything setup. This can be a disadvantage at the same time, because you cannot deploy regions in parallel and as creating APIM can take 45 minutes it might be beneficial to deploy two regions in parallel in case of an emergency. This would mean a release pipeline for each region, which also simplifies the entire thing when you want to add an additional region to your setup.
There are two scenarios when the release pipeline is run: one to create the APIM resources for the first time and the other to update an existing deployment with new products or security settings.
In the latter case, it's important to be aware there will be some outage during updating APIM during which you don't want to have requests routed to it. Good thing is we have a load balancer so to do a safe deployment to one of the regions, you need to temporarily remove that region from the pool in the load balancer so all traffic is routed to the region not updated. In a typical scenario the number of settings like policies and products won't change that often so it's not like this process is kicked off every day.
API's will be deployed to APIM regularly, but that's the responsability of the dev team and not of the team managing APIM.
Subscription keys alignment
One thing quickly overlooked is the fact that when creating a subscription (for a user for a product), a subscription key (guid) is generated by APIM which is different for each of the regions.
With the load balancer in place the consumer of the API can't (nor want to) know at which region the request ends up. Each request needs a subscription key, but which one to provide as every region has their own generated subscription keys? This should be transparent to the consumer, and to solve this we have to set a custom subscription key subscription so it will be the same in each region. This also is an issue when you want to retrieve tracing data with the ocp-apim-trace header.
In the screenshot below you see a custom subscription for a custom product with a generated subscription key. When creating a product there always is an administrator (with tracing permissions) and a regular custom subscription.

There are a couple of ways to set a custom value as subscription key.
One way is to use Powershell AzureRM as described by Tomas Restrepo
Another way is using the Management API as recently discussed by Mikael Sand
We decided to go for Powershell, but not use the AzureRM modules which are no longer supported but use the new Az.ApiManagement module.
In our solution we set the subscription for the regular user and one for the admin user (which has the tracing permissions), so also a single subscription key can be used when tracing is needed.
The Powershell below sets both subscription keys for a certain user for a certain product.
$resourceGroupName = "jps-blog"
$apimServiceName = "jps-blog"
$productId = "custom-product"
$userId = "jeanpaulsmit-hotmail-com"
$subscriptionKey = "custom-subscription-key-with-some-guid"
$adminUserEmail = "info@contoso.nl"
$adminSubscriptionKey = "admin-custom-subscription-key-with-some-guid"

# Login to the correct Azure Subscription
$Credential = Get-Credential
Connect-AzAccount -Credential $Credential

# Allow cmdlets to be used
Install-Module -Name Az.ApiManagement -AllowClobber -Scope CurrentUser -force

# Get reference to APIM instance
$apimContext = New-AzApiManagementContext -ResourceGroupName $resourceGroupName -ServiceName $apimServiceName

# Retrieve the subscription to modify
$subscription = Get-AzApiManagementSubscription -Context $apimContext -ProductId $productId -UserId $userId

# Set custom subscription key
Set-AzApiManagementSubscription -Context $apimContext -SubscriptionId $subscription.SubscriptionId -PrimaryKey $subscriptionKey -SecondaryKey $subscription.SecondaryKey -State $subscription.State

# Set the admin subscription key
$adminUser = Get-AzApiManagementUser -Context $apimContext -Email $adminUserEmail
$adminSubscription = Get-AzApiManagementSubscription -Context $apimContext -ProductId $productId -UserId $adminUser.UserId
Set-AzApiManagementSubscription -Context $apimContext -SubscriptionId $adminSubscription.SubscriptionId -PrimaryKey $adminSubscriptionKey -SecondaryKey $adminSubscription.SecondaryKey -State $adminSubscription.State
In the Powershell script the following steps are executed:
- Login to the correct Azure Subscription
- Install the necessary Az modules
- Get a reference to the APIM instance to update
- Get a reference to the subscription to update, based on ProductId and UserId
- Update the subscription by setting the subscription key
- Get a reference to the subscription to update, based on ProductId and admin UserId
- Update the subscription by setting the admin subscription key
The end results looks like this:
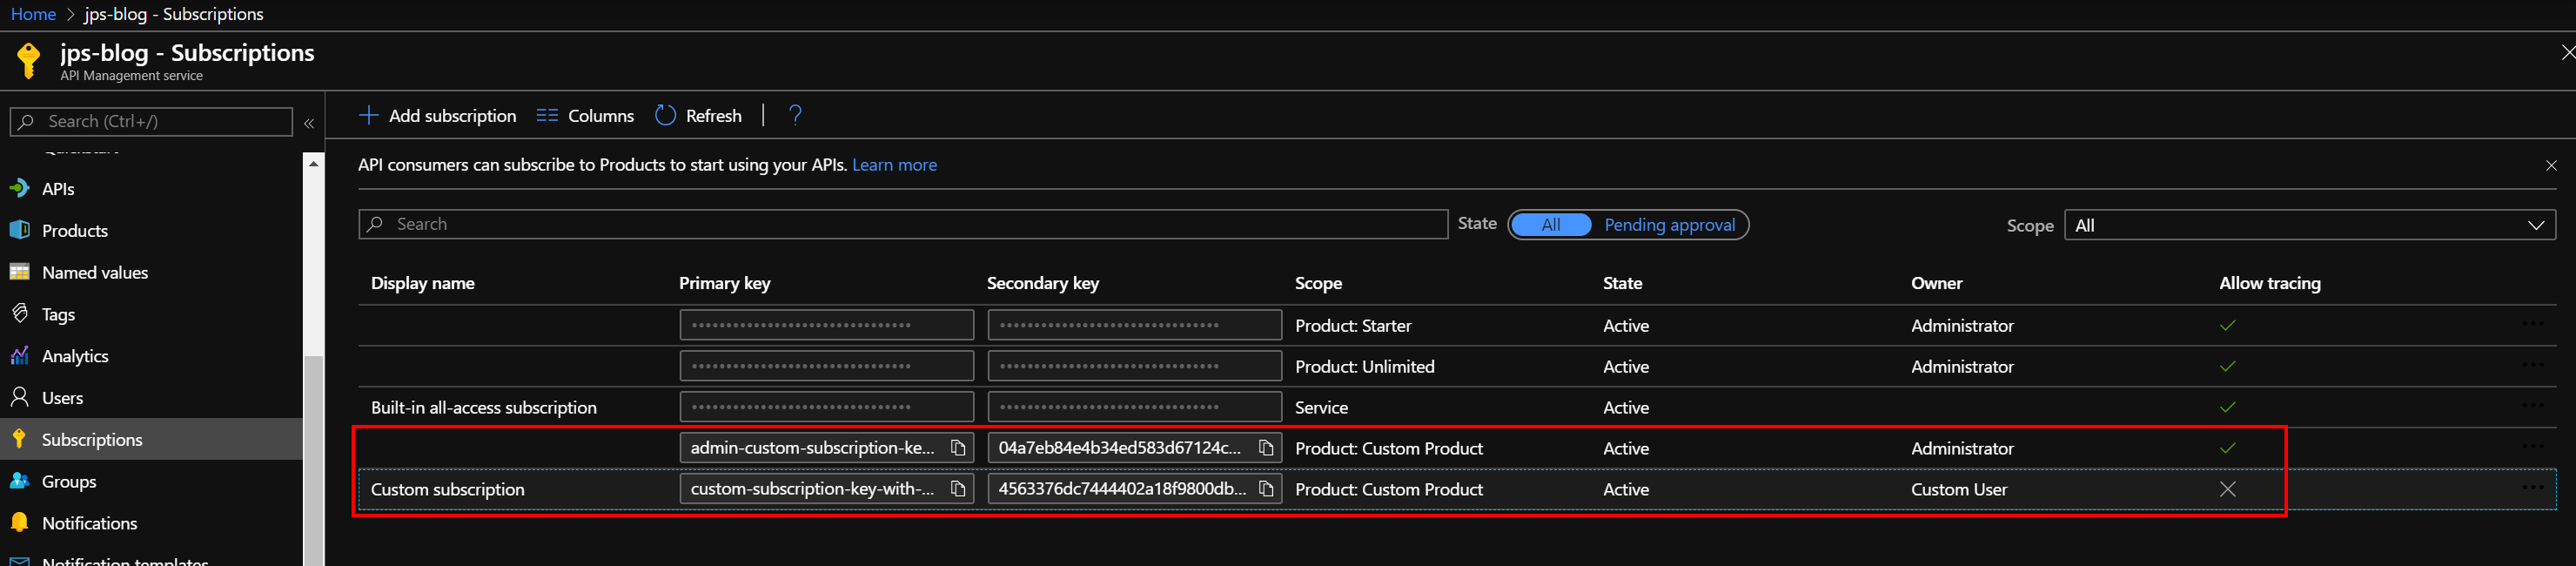
With the custom subscription keys in place, customers can use one key to access the API's regardless of the region. Administrators can use a single admin key to do the calls with the ocp-apim-trace header to retrieve tracing data.